

Start to Finish – Creating a Basic Christmas Light Show with Animation
We’re doing a series from start to finish on how to start from nothing and build your very own basic Christmas light show. To note, this is not the end all be all but this will help those that are just getting started and is a great starting point for those who are brand new to Christmas Lighting.
To get you started, you need to order some gear! Once you get everything ordered and delivered, you can begin putting everything together and I’ll show you how to do this later in the post. But first, let’s get everything ordered.
Computers
Before getting started, you’re going to need a computer to be able to run and schedule your lights on. It does not need to be anything fancy but I would recommend using a Windows system because Macs no longer support the XSchedule which you’ll need to schedule your lights with.
There is a way around this by using FPP, but I like to recommend XSchedule for those who are just getting started.
The PC doesn’t need to be brand new but it within a 10-year range and has the ability to work properly. You’re also going to need an ethernet cable.
Pixel Controller
Now to the fun stuff and getting everything you need ordered. First, you’re going to need a pixel controller.
![]()
For someone who is getting started, I do recommend going with a Falcon F4v3 Pixel Controller.
There are other controllers available that do a fantastic job. But for beginners this is a great place to start and be able to get your first Christmas light show going.
This Falcon controller to me, has proven it’s reliability, ease of use, and the configuration is very simple. That’s why I recommend this for someone who is just getting started.
Pixel Lights and Cables
The next item on the shopping list is pixel lights. I’ve purchased a lot of lights from various stores and my personal favorite has been Wally’s Lights.
![]()
With Wally’s Lights, there is a referral link that gives you $10 off your first order, so if you decide to go with them be sure to use this referral link and sign up to claim your $10 off.
You want to order some pixels and I suggest going with 12v pixels. Also from Wally’s Lights, you’re going to need some cables. When it comes to cables there’s a couple of things we’re going to need.
On the pixel controller referenced earlier, there are terminal blocks and with these, we wire up what is known as pigtails. So, when you buy pixels, you want to purchase the ones that have xConnect connecter pixels. These are the most common and coming increasingly popular now. So it’s best to go with.

You want to order some pigtails (quantity 4) and be sure to go with the xConnect pigtails.
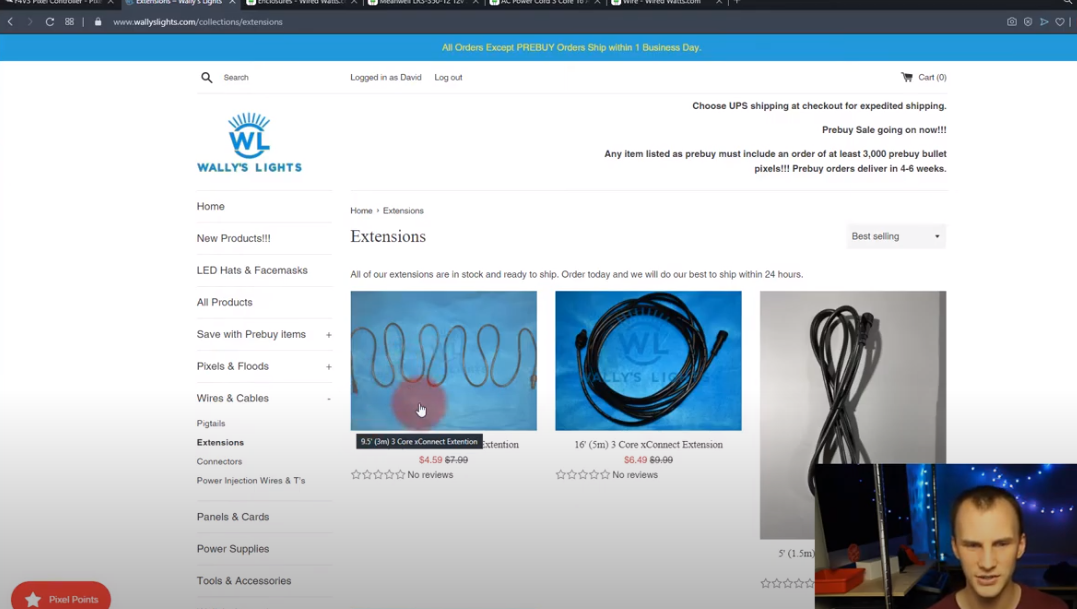
Lastly, for Wally Lights, you have extensions. It’s up to your setup on what you might need and they have a few option. Regardless, you are going to need your extension cords.
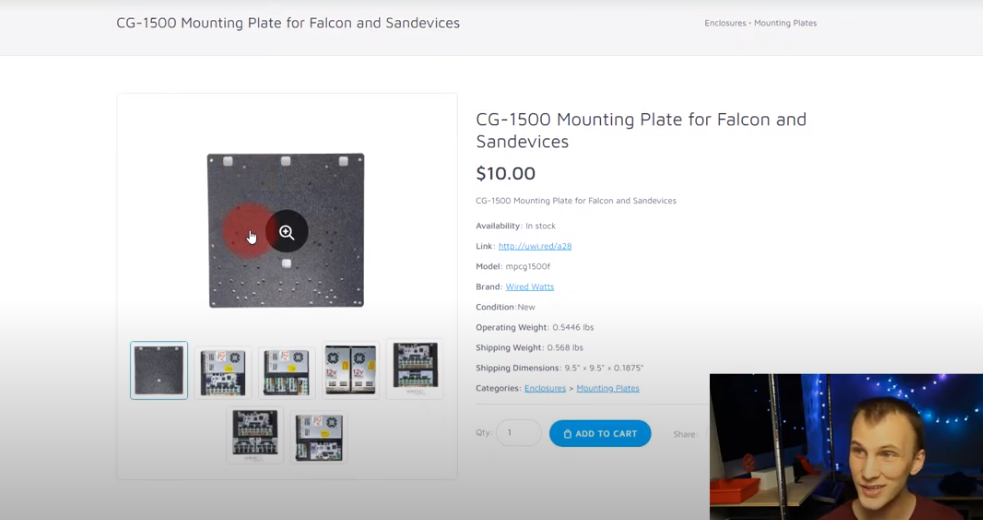
Enclosures
Next, we’re going to WiredWatts.com and I would like to note that they sell pixels as well. I have found that Wally’s Lights is a little cheaper for pixels and the $10 off is a great savings on your first order.

Next on the list is buying an enclosure from WiredWatts.com . Having an enclosure is essential because it keeps the controller and your electronics out of the weather.
Then, also on WiredWatts.com is a Mounting plate for the Falcon CG-1500.
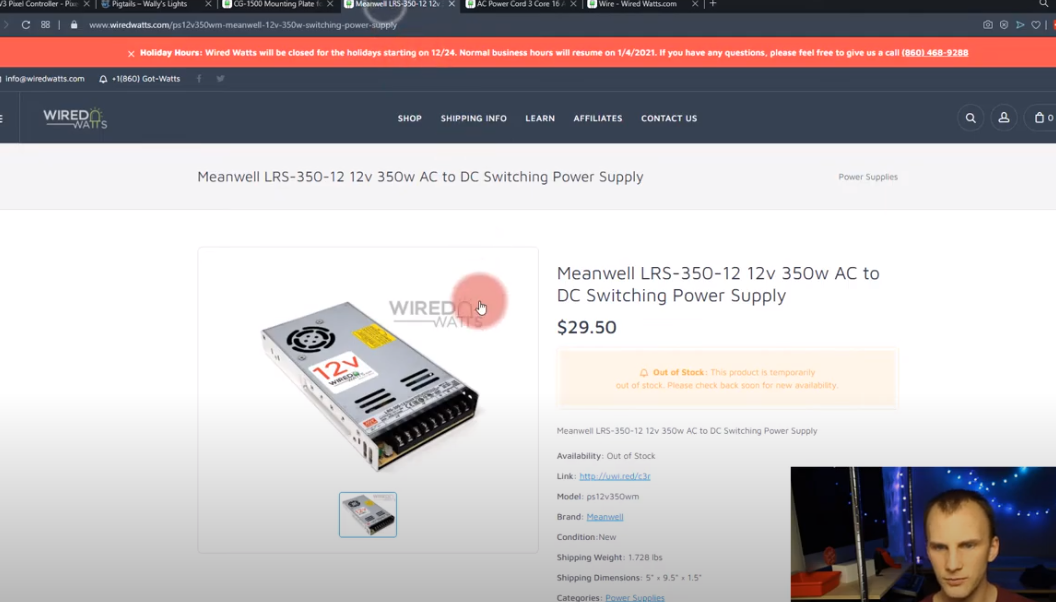
Power Supply
The last item on our list is getting what we need for a power supply. This starts with getting the Meanwell LRS-350-12V power supply unit.
You’ll then need an AC plug power cord. It comes stripped and is very easy to get setup.

Lastly, we need the wire. Now you can get this at a hardware store, however since you’re already on WiredWatts.com it’s easier and priced very well to just order it from here.
For safety’s sake, we’re going to go with 10 AWG wire and I recommend ordering 2 feet worth. In most cases, you only need a foot but having a little extra will not hurt at all.
Building Your Pixel Controller
Now that we have all of our supplies, it’s time to start building our pixel controller. Here is the step by step tutorial on how to build your controller using the items purchased from supplies list.
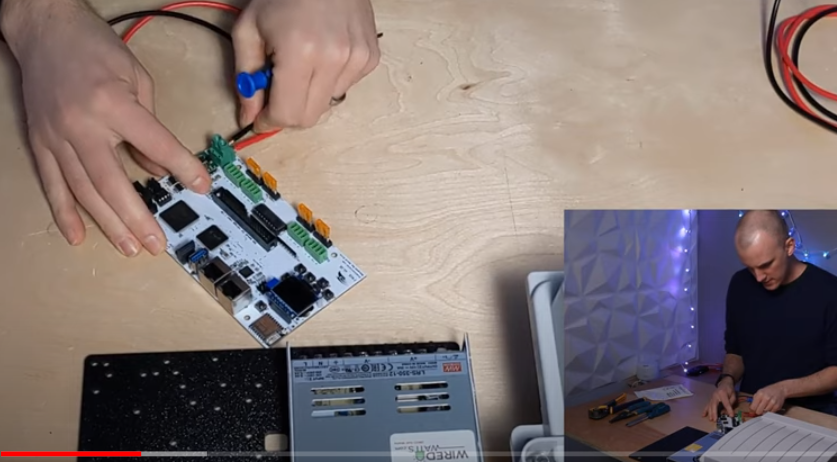
We’ll get started with our CableGuard enclosure, the mounting plate, and our Falcon controller F4V3. The first step is laying out our large pieces on the mounting plate from WiredWatts.com.

Before we mount anything, we want to hook up our wires between the power supply and our Falcon controller. I’ve pre-stripped one red and one black wire.
Please note, never work with live power and if you don’t feel comfortable do ask someone who is familiar with working with live power.
Setting Up Your Wires for Power Supply
As I mentioned, I’ve already pre-stripped the wires. The terminal blocks will come from the factory closed, so you will need a flat blade to open those up. “V” for voltage is going to be your red wire, just slip it in, make sure no wires are left out, and tighten it down.
Left is Loose and Right is Tight. Make sure they are tightened down very well and repeat the same steps for the black wire. Next, you’re going to use your screwdriver and connect your wires to the V+ and V- on the power supply unit.

The steps will be the same. Loosen up the terminals, slide your stripped wires in, and then tighten them down.
Tightening Your Mounting Plates
The next step, is lightly flipping over your mounting plate and screwing in your power supply unit and the Falcon controller. There will be a Falcon screw kit included with various sizes in screws and spacers.

Starting with the power supply unit, lightly tighten the opposite sides of the unit but tighten it all the way down just yet. Then, lightly tighten down the other two screws for the power supply unit.
Next, you can set the mounting plate and the power supply unit on its side in preparation for mounting your Falcon controller.

This is where the spacers will come in handy and allow you to protect your controller and over-torquing the screws. Line up your screws and controller, and once you set your screw on the mounting plate, slide your space on the opposite side of the mounting plate where it will be touching the controller. Then, using the nut, lightly twist it on.

You can start by tightening down with your hand and then use a nut driver or a pair of pliers to start tightening it down. Set up another screw in the same steps before tightening down all the way.

Wire Up Everything in the CableGuard Enclosure
Now, that the mounting plate is ready, we can begin setting up everything inside of the CableGuard enclosure.

With the enclosure, you are able to set up and slide in your power supply cord. I choose to use the hole it’s closest to where it will be set up.

On the power supply unit, I am able to then wire up the power supply cord. Green is for ground, white is for neutral, and black is for live. If you do have different colors please consult the manufacturer to figure out which is which.
Setting Up Your Pigtails
I do suggest going with xConnect connectors because that’s what are most people are going to now. The xConnect is a female pigtails that has a threaded ring, make sure the threaded ring is on the pigtail before installation.
You do want to label your pigtails, I normally do 1, 2, 3, and 4. You can label these however you want. Starting with one pigtail you can feed it through the enclosure hole and grabbing a terminal block just loosen it up as they do come tightened down from the factory.

When you line up the terminal block on the controller, you’ll see ground, clock, data, and voltage. With most pixels in the Christmas lighting hobby we do not have a clock option.
Just as you did earlier, you want to slide the wires at the end of your pigtails in to the appropriate terminal blocks. If you are unsure always be sure to check with the manufacturer. With the pigtails coming from WiredWatts.com, I know that black is ground, yellow is data, and red is voltage. Once you have the wires in, tighten them down.

You would do the same with the other three pigtails. Lightly pull the slack out of the enclosure and plug your pigtails in the appropriate terminal blocks.

Network Cable
The last step is getting your network cable set up. Using the second to last hole in the enclosure, pull your network cable through and plug it into the pixel controller.

Just make sure everything is tightened down, lightly push the slack from your cables through. You are then ready to test and make sure everything is able to power on.
Getting Control and Making Your First Seqeunce
Now that your controller has been put together and tested, you’re ready to get started with controlling and creating your first sequence!
Falcon Configuration
The first step is getting your Falcon controller configured and connecting to xLights. When you power up your Falcon, it will take a few moments to light up and will be looking to connect with a router and an IP address.

If you do not have a router, the controller will connect to a specific IP address which will be listed on the controller screen. On your computer, you will be able to connect to that IP address and begin configuring your Falcon controller.

As you get started click “Network Configuration” on the top menu bar. Disable the DHCP, leave the IP address as is, and click save. The unit will then reboot and be ready to go.
xLights Setup
Now, you can open up xLights and if this is your first time using xLights, it may be best to save your sequences in the documents/xlights folder.
On the xLights program, click “Discover”, and the program will be looking for any available controllers to connect with. At this point, you should be able to locate your Falcon controller on the network.

Once it finds the controller, you will notice that some of the options are set automatically. While automatic settings aren’t ideal but when first getting started it’s a nice feature.
To test out your pixels, click the “Layout” tab. In this tutorial, I used the matrix to test the lights on. Click the matrix and drag to outline it out.

In the left sidebar, you have some items to fill in. For # of strings, that’s going to be the number of connections to your controllers. The nodes are the number of nodes on one string. The strands are how many times it goes back and forth. Then click “Save”.
You will see a Brightness option and for that be sure to set your lights to 50% and then click “Save” Go back to the “Controllers” tab, select your controller, and then click “Visualize”.
![]()
You’ll see the matrix in the right corner, just drag and drop to your first port. It will auto-fill the needed ports. Close the screen and then click “Save”.
Creating Your First Sequence
Now, you are ready to create your first sequence. Click “New Sequence” and select “Animation”. Once it sets up you want to select the option “Output to Lights” at the end of the top menu bar.

From there you can test any prop or your pixels by selecting an effect to see how it plays out on your lights. From there you can build any sequence and just have fun seeing what different effects look like on your pixels!
Want to Create a Great Christmas Lighting Display This Year?
Grab our free guide and get started today:
