
How Do I Push Pixels into Corrugated Plastic (Coro) Props?
For my Christmas setup this year I am adding snowflakes to the display. In this tutorial, we’re going to walk through how to push pixels into the prop, add them to xLights, and how to work with the wiring diagram to saving time and frustration.
Coro Prop Layout
The props used in this video are 2 sided and fairly simple to work with. Personally, my preference is to work with 50-pixels string at a time but these props only need 48 pixels.
Looking at the prop, note that the front side of your prop is going to be the flat side and this is where your pixels are going to stick out. The backside of the prop with the hole is where you will feed your pixels through.

Before you start pushing your pixels in you want to make sure you add these in right so that you only have to do this once for the initial set up, so how should you do this?
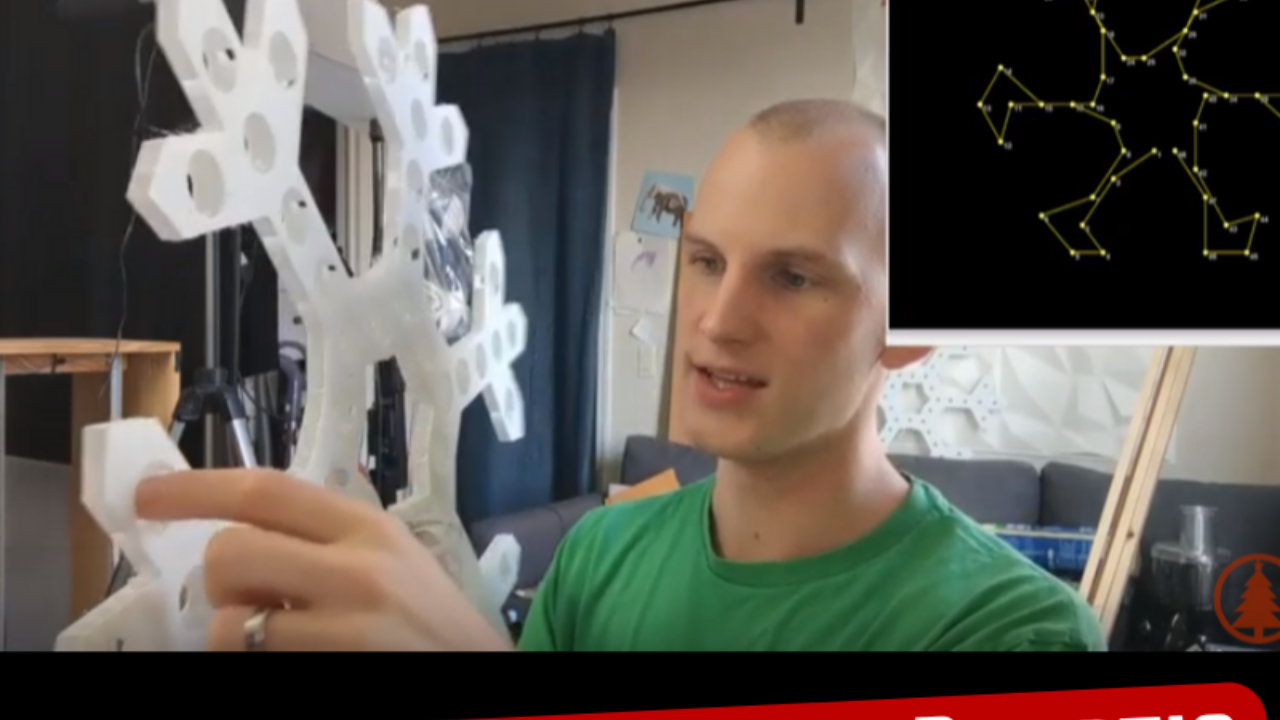
Finding the Wiring Diagram
While to most this is just a snowflake prop, there’s a lot more going on behind the scenes especially when we’re working with pixels. So, to help save you some time and headaches we’re going to make sure we add these pixels in the right way.
Inside of xLights you want to click “Create New Download” and a window will popup. Here you will select the brand of your prop and then select the type. Next, you want to add it to your display and once it’s added we can get the wiring diagram to work off.

On the display, inside of xLights, select the prop, right-click, and select “Wiring View”. This is the key and will give you the wiring diagram on how to add your pixels to the prop. You’ll notice on the wiring diagram it does note that it’s the reverse view since your adding the pixels to the backend of the prop.
Pushing In Your Pixels
With the prop ready and your wiring diagram as the roadmap, you are just about ready to get started. Get started with laying and smoothing out your pixels. You want to make sure that you have your pixels going in the right way.
With the pixels I used in this tutorial there is an arrow on the back of the pixel indicating if the data is going in or the data is going out. Other pixels may not have an arrow but will have initials on the back of the pixels such as DI or DO. DI stands for Data In and DO is for Data Out. Make sure to find the first pixel and it’s labeled as the Data In pixel.

Now that you have the pixels ready to go and the diagram it’s time to start punching in the pixels. In the tutorial, I used the square nodes which are easier to work with for this prop but the bullet nodes may take a little more effort to add to the prop.
Once you’ve added the pixels for the first side of the flake make sure that it looks right when you view it from the front. The wires should be at a minimum if done correctly. Then continue on with the rest of the prop.
With the finished product, everything should look nice and neat from the front-facing view. The wires on the backside of the prop should mostly be organized and barely in view.

Depending on where the prop is being set up on your display you may consider zip tying the wires on the back of the prop. With this being set up on the porch and 15 feet away from the normal viewer, this is something that needed to be done. However, that just depends on your personal preference
Finishing Touches
For the display I am using this year, I have 3 snowflake props set up on the porch. But as a backup, I did set up a fourth prop just in case one of the props need to be replaced. Sometimes, having a backup plan or a spare available will be a great help so you can just replace the prop and fix the other unit when you’re ready to.
As I mentioned earlier this particular prop takes 48 pixels but I always work with 50 pixels strands, so what do you do with the other 2 pixels? You have a couple of options with these. You can either sauder off the two extra pixels or you can just account for the two pixels in xLights.
Inside of xLights, I add the two extra pixels as blackouts or null pixels. Once you add these, it’s easiest to keep them at the top of the lists and always keep them set as black in the display so nobody is going to notice them in your setup.
Want to Create a Great Christmas Lighting Display This Year?
Grab our free guide and get started today:

